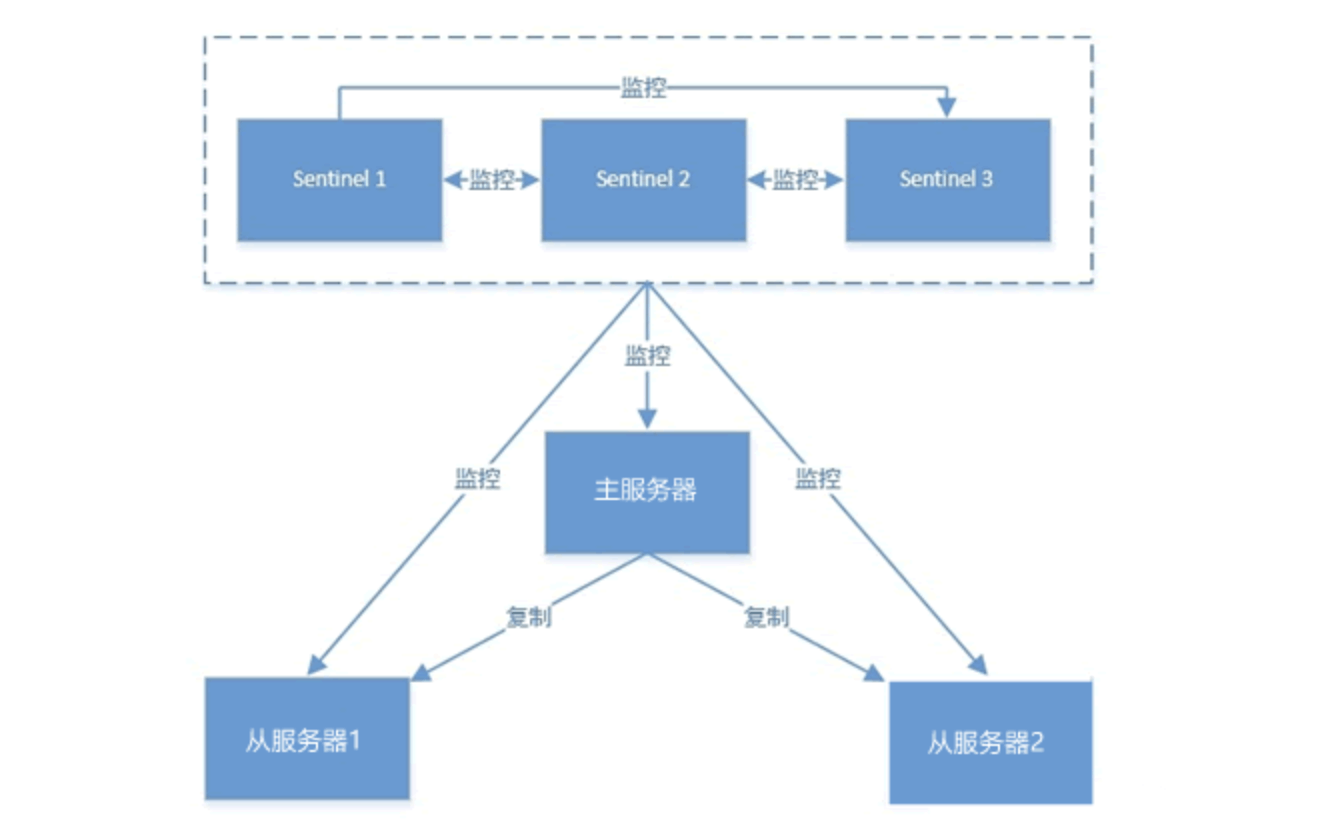
Redis哨兵模式是一种特殊的模式,首先Redis提供了哨兵的命令,哨兵是一个独立的进程,作为进程,它会独立运行。其原理是哨兵通过发送命令,等待Redis服务器响应,从而监控运行的多个Redis实例。本文记录一下搭建Redis哨兵模式集群的步骤。
环境信息
这里的部署集群为3节点(1主2从3哨兵),系统为CentOS7。
| 节点IP | 作用 | 端口 | 备注 |
|---|---|---|---|
| 192.168.110.216 | redis主节点 | 6379 | 默认端口 |
| 192.168.110.217 | redis从节点 | 6379 | 默认端口 |
| 192.168.110.218 | redis从节点 | 6379 | 默认端口 |
| 192.168.110.216 | redis-sentinel | 26379 | 默认端口 |
| 192.168.110.217 | redis-sentinel | 26379 | 默认端口 |
| 192.168.110.218 | redis-sentinel | 26379 | 默认端口 |
这个是搭建之后的架构:

redis主备搭建
安装redis
安装redis的步骤可以参考redis单机安装的文章:Redis单机部署
安装之后的redis的目录为/var/local/redis
创建redis配置文件
先创建本地数据存放的目录/data/redis
mkdir -p /data/redis
在redis的安装目录的etc下面创建一个自定义的配置文件redis.conf作为启动文件,内容如下:
# 监听端口
port 6379
# 守护进程的形式运行
daemonize yes
# 进程PID
pidfile /var/run/redis.pid
# 日志文件
logfile /var/log/redis.log
# 指定本地数据库存放目录
dir /data/redis
# 设置密码,主备集群设置密码需要同时设置如下两个字段
requirepass redis666
masterauth redis666
上面的配置内容是3个节点都要设置的相同配置内容,另外需要在两个从节点的配置中添加额外的配置,如下(其中配置的就是主节点的IP和监听端口):
replicaof 192.168.110.216 6379
启动redis集群
cd /var/local/redis && ./bin/redis-server ./etc/redis.conf
登录redis查看集群状态
cd /var/local/redis && ./bin/redis-cli --pass redis666
登录主节点(192.168.110.216)之后在命令行中执行查询命令,查看返回如下:
[root@zero-1 redis]# cd /var/local/redis && ./bin/redis-cli --pass redis666
Warning: Using a password with '-a' or '-u' option on the command line interface may not be safe.
127.0.0.1:6379> info replication
# Replication
role:master
connected_slaves:2
slave0:ip=192.168.110.217,port=6379,state=online,offset=420,lag=1
slave1:ip=192.168.110.218,port=6379,state=online,offset=420,lag=1
master_failover_state:no-failover
master_replid:97669e0e33b450f8f39ee73bb1d499b03cc1f4ef
master_replid2:0000000000000000000000000000000000000000
master_repl_offset:420
second_repl_offset:-1
repl_backlog_active:1
repl_backlog_size:1048576
repl_backlog_first_byte_offset:1
repl_backlog_histlen:420
127.0.0.1:6379>
这里是可以看到从节点的信息和状态的。
登录从节点之后执行同样的命令查看到的信息如下:
127.0.0.1:6379> info replication
# Replication
role:slave
master_host:192.168.110.216
master_port:6379
master_link_status:up
master_last_io_seconds_ago:1
master_sync_in_progress:0
slave_read_repl_offset:378
slave_repl_offset:378
slave_priority:100
slave_read_only:1
replica_announced:1
connected_slaves:0
master_failover_state:no-failover
master_replid:97669e0e33b450f8f39ee73bb1d499b03cc1f4ef
master_replid2:0000000000000000000000000000000000000000
master_repl_offset:378
second_repl_offset:-1
repl_backlog_active:1
repl_backlog_size:1048576
repl_backlog_first_byte_offset:1
repl_backlog_histlen:378
127.0.0.1:6379>
这里可以看到主节点的信息和状态。
此时可以在主节点写入一些数据(从节点默认只读,不能写),然后去从节点查询,能够正常查询到说明主从配置完好。
至此,redis主从集群已经配置完成,下面需要做的就是搭建哨兵。
redis哨兵搭建
redis安装之后自带redis-sentinel,所以不需要单独安装。
创建redis-sentinel配置
先创建本地数据目录/data/redis-sentinel
mkdir -p /data/redis-sentinel
然后在redis安装目录的etc中创建一个sentinel.conf文件,内容如下:
vi /var/local/redis/etc/sentinel.conf
# 监听端口
port 26379
# 守护进程的形式运行
daemonize yes
# 进程PID
pidfile /var/run/redis-sentinel.pid
# 日志文件
logfile /var/log/sentinel.log
# 工作目录
dir /data/redis-sentinel
# 这里定义主库的IP和端口,还有最后的2表示要达到2台sentinel认同才认为主库已经挂掉
sentinel monitor redismaster 192.168.110.216 6379 2
# 主库在30000毫秒(即30秒)内没有反应就认为主库挂掉(即主观失效)
sentinel down-after-milliseconds redismaster 30000
# 若新主库当选后,允许最大可以同时从新主库同步数据的从库数
sentinel parallel-syncs redismaster 1
# 若在指定时间(即180000毫秒,即180秒)内没有实现故障转移,则会自动再发起一次
sentinel failover-timeout redismaster 180000
sentinel deny-scripts-reconfig yes
# 如果设置了密码,这块是要写的
sentinel auth-pass redismaster redis666
更多配置可以见官方文档https://redis.io/docs/management/sentinel/
启动哨兵
cd /var/local/redis && ./bin/redis-sentinel ./etc/sentinel.conf
登录查看哨兵状态
在任意一个节点上面登录到命令行中,执行命令查询哨兵信息:
[root@zero-1 redis]# cd /var/local/redis && ./bin/redis-cli -p 26379
127.0.0.1:26379> info sentinel
# Sentinel
sentinel_masters:1
sentinel_tilt:0
sentinel_tilt_since_seconds:-1
sentinel_running_scripts:0
sentinel_scripts_queue_length:0
sentinel_simulate_failure_flags:0
master0:name=redismaster,status=ok,address=192.168.110.216:6379,slaves=2,sentinels=3
127.0.0.1:26379>
这里里面可以看到主库是192.168.110.216:6379,从库有2个节点,哨兵有3个节点。
高可用验证
主库异常
停掉主库redis,然后再去查看哨兵的信息,可以发现其中一个从库会变成主库:
[root@zero-1 redis]# cd /var/local/redis && ./bin/redis-cli -p 26379
127.0.0.1:26379> info sentinel
# Sentinel
sentinel_masters:1
sentinel_tilt:0
sentinel_tilt_since_seconds:-1
sentinel_running_scripts:0
sentinel_scripts_queue_length:0
sentinel_simulate_failure_flags:0
master0:name=redismaster,status=ok,address=192.168.110.216:6379,slaves=2,sentinels=3
127.0.0.1:26379>
127.0.0.1:26379>
127.0.0.1:26379> info sentinel
# Sentinel
sentinel_masters:1
sentinel_tilt:0
sentinel_tilt_since_seconds:-1
sentinel_running_scripts:0
sentinel_scripts_queue_length:0
sentinel_simulate_failure_flags:0
master0:name=redismaster,status=ok,address=192.168.110.218:6379,slaves=2,sentinels=3
127.0.0.1:26379>
上面这个查询是停掉主库前和停掉之后查询的结果,可以看到主库自动切换了符合预期)。
此时登录到新的主库执行集群查询信息,可以看到只剩下一个从库了(符合预期)。
[root@zero-3 redis]# cd /var/local/redis && ./bin/redis-cli --pass redis666
Warning: Using a password with '-a' or '-u' option on the command line interface may not be safe.
127.0.0.1:6379> info replication
# Replication
role:master
connected_slaves:1
slave0:ip=192.168.110.217,port=6379,state=online,offset=121765,lag=1
master_failover_state:no-failover
master_replid:724c11c997152694e5e530c535198f9b13ad7a58
master_replid2:97669e0e33b450f8f39ee73bb1d499b03cc1f4ef
master_repl_offset:121913
second_repl_offset:78705
repl_backlog_active:1
repl_backlog_size:1048576
repl_backlog_first_byte_offset:1
repl_backlog_histlen:121913
127.0.0.1:6379>
此时重新启动异常的节点,再次查询可以发现原来异常的主库变成了从库(符合预期)。
从库异常
从库异常的情况就很简单了,主从不会切换,只是从库减少1个实例而已。
参考文章
版权声明:如无特殊说明,文章均为本站原创,转载请注明出处
本文链接:https://tendcode.com/subject/article/redis-install-sentinel/
许可协议:署名-非商业性使用 4.0 国际许可协议
abusizhishen
1 楼 - 2 年,2月前
测试二级评论